Update: December 28th 2015

So the car has been on the road on and off since paint and tuning. I have been working out reliability issues and shaking down all the sub systems. The largest problem was the OEM head gasket failing with high boost. The boost was stretching head studs and lifting the head; burning the fiber gasket and mild steel fire rings:
I knew this was a possibility but seeing as no other head gaskets were available for this engine I went with it on the original build on the off chance it would work. The gasket failed so I was back to the drawing board. For reference there are several types of head gasket: 1: fiber with steel fire ring 2: multi layer steel and 3: copper. Multi layer steel is the most resilient for high performance applications; allowing the head to rise and fall on a small scale without loosing seal. After some homework I found a manufacturer in Thailand that could custom stamp multi layer spring steel gaskets. The company is Gaskets to Go   for reference. They were not cheap but necessary to hold up under high cylinder pressures:
I buttoned up the heads using ARP head studs, then went for a drive: Click.   The shake down is hardly over, a stronger 01E transmission is going in, new hard lines for the oil drain, deleting one wastegate flange that is unused, and making better heat shielding for the hot side. The end goal being a totally reliable street-able 800hp setup.

Update: March 9th 2014

This update is long overdue and covers a lot of ground.  The fabrication and assembly is complete as well as wiring the new harness from the Megasquirt MSII to the engine.  After a few attempts the engine started and ran.  Video here: First start upSecond start upThird start up and walk around.  As you can see the car is still very rough and the body panels have been swapped out with the RS4 body parts allowing a wider stance and the ability to run 10" wide tires all around. The engine has been started, idled, the oil changed several times to clean any thing out from assembly, and driven roughly 20 miles.  I have dropped the car off at the body shop to get the remaining bodywork completed and resprayed in laser red.  After this the only things that remain are test/tune, wiring the factory gauge cluster in to the megasquirt, and a few fuel system upgrades.  Body and paint will be covered in a separate post.  

Update: May 11th 2012


http://forums.quattroworld.com/s4/msgs/154565.phtml

See above link for pictures and write-up.  Car is getting closer to completion with each visit back home to work on it.  Planning on bringing it with me on a trailer next time, that way I can finish out the small details, work out bugs, and start tuning.

The project is starting to gather attention as 2 online sites contacted me to do a feature on the project.  I decided to refrain until it was more presentable.

Update: Nov 5th 2011

As of current all the new engine parts are now ready to go for assembly. The block has been bored and honed to fit the JE pistons. Integrated engineering rods and pins, factory seal set and bearings. Started chopping up the 3" mandrel bends and fabricating an exhaust system from the back of the car forward staring with the muffler and hangers; all 304 stainless. Im building everything on this car to take a beating at the track and hold up. Next step is to assemble the motor and get it to start it on the factory ecu to ensure everything works as it should prior to using a different ecu. This way we limit the amount of variables changed all at once, and it makes for easier trouble shooting. After that I will wire the megasquirt ecu into the factory harness and begin the tuning process. The plan is to push the motor to in the neighborhood of 10k rpms with full boost hitting ~30 psi once the engine is finished the task of clutch fitment and transmission reliabilty will be tackled.

Nov 5th 2011:  See link here: http://forums.quattroworld.com/12vv6/msgs/2383.phtml
for updated pictures until I have time to make a permanent post in the engine build section.

Engine build selection.

When deciding on what kind of project car to build, certain goals must be made to start the process: do you build a car around your goals or tailor your goals around an existing vehicle.... Track car or street car or both? In this case it was going to be mainly a street car, as public roads suck for traction all wheel drive was a must. The car was also to be a sleeper of sorts, so a 4 door car was ideal. The overall price was an issue so the initial price of the car had to be fairly cheap. Even though it was to be a sleeper, it still needed to look good. With those ideas in mind this is the decision I came to: take a car I already had that was cheap and make it into something more fun to use. The project had a budget constraint and but needed to be done right still.

Some people build a fast car by hiring other to do the work and just throwing money at the project until it is what they want. If I had to guess I would say 80-90% of all cars you see in tuner magazines fall under this category, aside from shop cars the rest are generally owned by someone who has more money than knowledge. Doing some homework and research on a project can cut down on the time and money required to complete it granted you have the patients for it....most do not.

Back To The Future: 1996


The B5 platform was introduced that year. The evolutionary step from the Audi 90 and 100 that preceded it. The lines were smooth and refined from all other Audi models at that time. Originally designed as a family hauling, grocery getting, soccer practice taxi, four door sedan. It was ahead of its time, and the design was kept in production for nearly a decade.

The B5 platform originally came in 2 engine variants:
2.8 liter NA V6 12 valves 176hp
1.8 liter turbocharged inline 4 (20 valves) 150hp

Over the next few years a 2 new engine variants were introduced:
2.8 liter v6 30 valves (replaced 12v engine) 196hp
2.7 liter v6 30 valves with twin turbos 250hp

The original v6 was coded the AFC and had a close cousin named the AAH. Both used 2 valves per cylinder and were rated from the factory to produce 176 hp; roughly 116 wheel horse power was seen out of these on the Quattro models.

Since its release, various enthusiasts have pioneered and developed new parts for the car to increase the power output. The main member of those members being Mance Edtherige of Vintage Audi Performance. His part developments include ported throttle bodies, intakes, and lightened pulleys.

The AFC and its older cousin, the AAH, were controlled by Hitachi ECU that was not easily tuned. A chip re-tune was not available for this car until 2008 when 034 Motorsports started offering a chip tune for select ecu's. As there were limited resources for tuning this motor for so long, many considered it a dead end motor, not a viable candidate for modifications.

Even with all the intake, exhaust, and ecu modifications the car would only squeeze out roughly 250 hp; a respectable but still conservative amount of power. The engine was always thought of as a dead end by the Audi community. It was considered impractical to modify because of the amount of money involved in making it perform better.

Of all the variants, the 12 valve v6 can usually be found the cheapest. I picked mine up in 2003 for $7200 with 68,000 miles. It was in good condition with the Quattro all wheel drive system mated to a 5 speed automatic transmission (01V). It had the AFC engine variant.

For more information about the B5 platform, see the Wikipedia article.
For more information about the AFC & AAH, see 12v.org

Early Attemps At Modification

The naturally aspirated v6 was a dog to drive. The car drove smooth, was comfortable and quiet but that's about all it had going for it. It would serve a middle aged mother of 3 just fine but the body lines, color, and all wheel drive setup screamed to be modified. Looking at some examples of what the B5 can look like when tuned up explains everything:


There were multiple paths I could take to get where I wanted, the first and easiest was to perform the standard intake and exhaust modifications but that would only net round 200hp (this was before the chip existed). Some recommended swapping in a S4 2.7 engine I nixed this due to extreme cost of going to the s4 motor and then having to modify it further to reach my goals. Others said go to a 1.8t, but the idea of going to a smaller engine seemed counter productive especially since it would have to be modified further also. One suggestion that I had got was to swap in a small block chevy engine. I actually tossed this idea around for a while but couldn't bring my self to tarnish the poor car with a domestic engine, not to mention the electronics nightmare of mating a German car with an American engine and hell will freeze over before I would ever put a carburated engine in such a nice car. From the get go everyone in the Audi community advised against starting with a 12 valve engine if you wanted more than a few hundred hp. Everyone thought that it would be prohibitively expensive. Being stubborn I decided to just ignore them all and work with what I had.

The best thing about using a platform that no one else wants is parts availability. Before there were other engine options, certain aftermarket companies made a handful of performance parts for this motor. Now that other people are using all sorts of more "acceptable" engines, these parts can be had at a fraction of the original cost. Eurospec cams for example were $1100 new, I lucked out and got them for $250, an Unorthodox Racing billet aluminum 10lb flywheel; new they cost $550, I found one used for $200.

Conversely, parts availability is also the worst thing about using a platform that is older. Yea I found some great deals on parts like the flywheel, but that flywheel also took me 6 months of searching to find. There is a saying about food that you can have it fast good or cheap but you can only pick two. The same goes with car parts. You can get good parts fast but you'll pay full list, by exercising some patients you can find good parts cheap but not fast. Never get cheap parts fast, its not worth it, eventually they will break and you will have to replace them. When I say patients, I mean it. It took me 4 years to collect all the parts I needed. By having it as a casual hobby you give yourself plenty of time to plan, learn, and buy things as your finances allow. I have seen people slap projects together in a hurry but they usually dont end up working right, taking time to plan is the key to a successful project.

Business In The Front, Party In The Back: The Rear Mount Turbo

My first experiment was to see how the engine would handle boost with the stock ecu, a practice that many have tried and ended up with blown motors. I toyed with it anyway and managed to make it work with out destroying anything. With some simple modifications the setup functioned reliably. The rear mount turbo setup works just like any other turbo setup but the turbo is not in the engine compartment but rather in place of one of the mufflers. Here are some pictures of the old setup:


The car still fit on a standard lift with the turbo setup underneath:

At one point I had a comprehensive write-up on how to do everything in this setup but the site it was hosted on (cardomain.com) was unreliable and it was lost. I may go back and revise this with all those details but for now a general overview and results are the only things we need.

The engine handled the boost rather well, the only things that had to be done were to adjust the fuel injector pulse widths with an Apexi AFC Select (AFC stands for air flow converter and is just a coincidence it is the engine code).


The crank case ventilation had to be re-routed to an oil catch can with a check valve to prevent the boost from blowing the valve cover seals out. The engine was fitted with an adjustable 4.0 BAR fuel pressure regulator. The oil feed line was run from the oil pressure sending unit (the sensor that lights up the oil light on your dash when the oil pressure goes down):


The upper oil pan was drilled for an oil return fitting:

The back side of the fitting secured with a nut and red thread locker:


A Tilton oil return pump was also used because the turbo sat low enough that the oil would not gravity feed back to the pan.

Here is a quick video of the car instruments with the rear mount turbo, not very exciting but worth noting:


Once it was all said and done I made 225hp and 215lbft torque on 93 octane with 10lbs of boost. Not bad but the motor was pushed to its limits and was always on the verge of pre-ignition because of the high compression ratio of 10:1. The motor held up well overall, the transmission however started to slip and burn the clutch packs from the power. It also became clear that the Bosch ECU would never be an option if the car was to make significantly more power. It had to go.

SCCA times

Here are some videos of it running the course:

http://www.youtube.com/watch?v=XUPytW4uq1k

http://www.youtube.com/watch?v=50lTR0m0Zmg

http://www.youtube.com/watch?v=p8z5HHMepUE

Routine Maintenance

For those of you who have an Audi you may already know they are maintenance intensive as they age. Everything from sunroofs to seals needs attention. Audi makes a great product but they are limited by mass production prices. Plastic and rubber products are used extensively where other materials might be a better choice, and the plastic becomes brittle after a few years. Among the many things that needed to be serviced on the car or upgraded to handle the power, the heater core was the worst to replace short of pulling a motor. The part is nested deep under the dash by the firewall. The plastic had become brittle after 12 years of coolant running through it. It did its job but had to be replaced.
The picture speaks for itself....there are literally hundreds of parts behind the dash. This is just the maintenance, we haven't even got to the modifications yet... Just letting you know what your getting into if you want to start a project like this. Just routine maintenance...

Conventional Turbo Setup

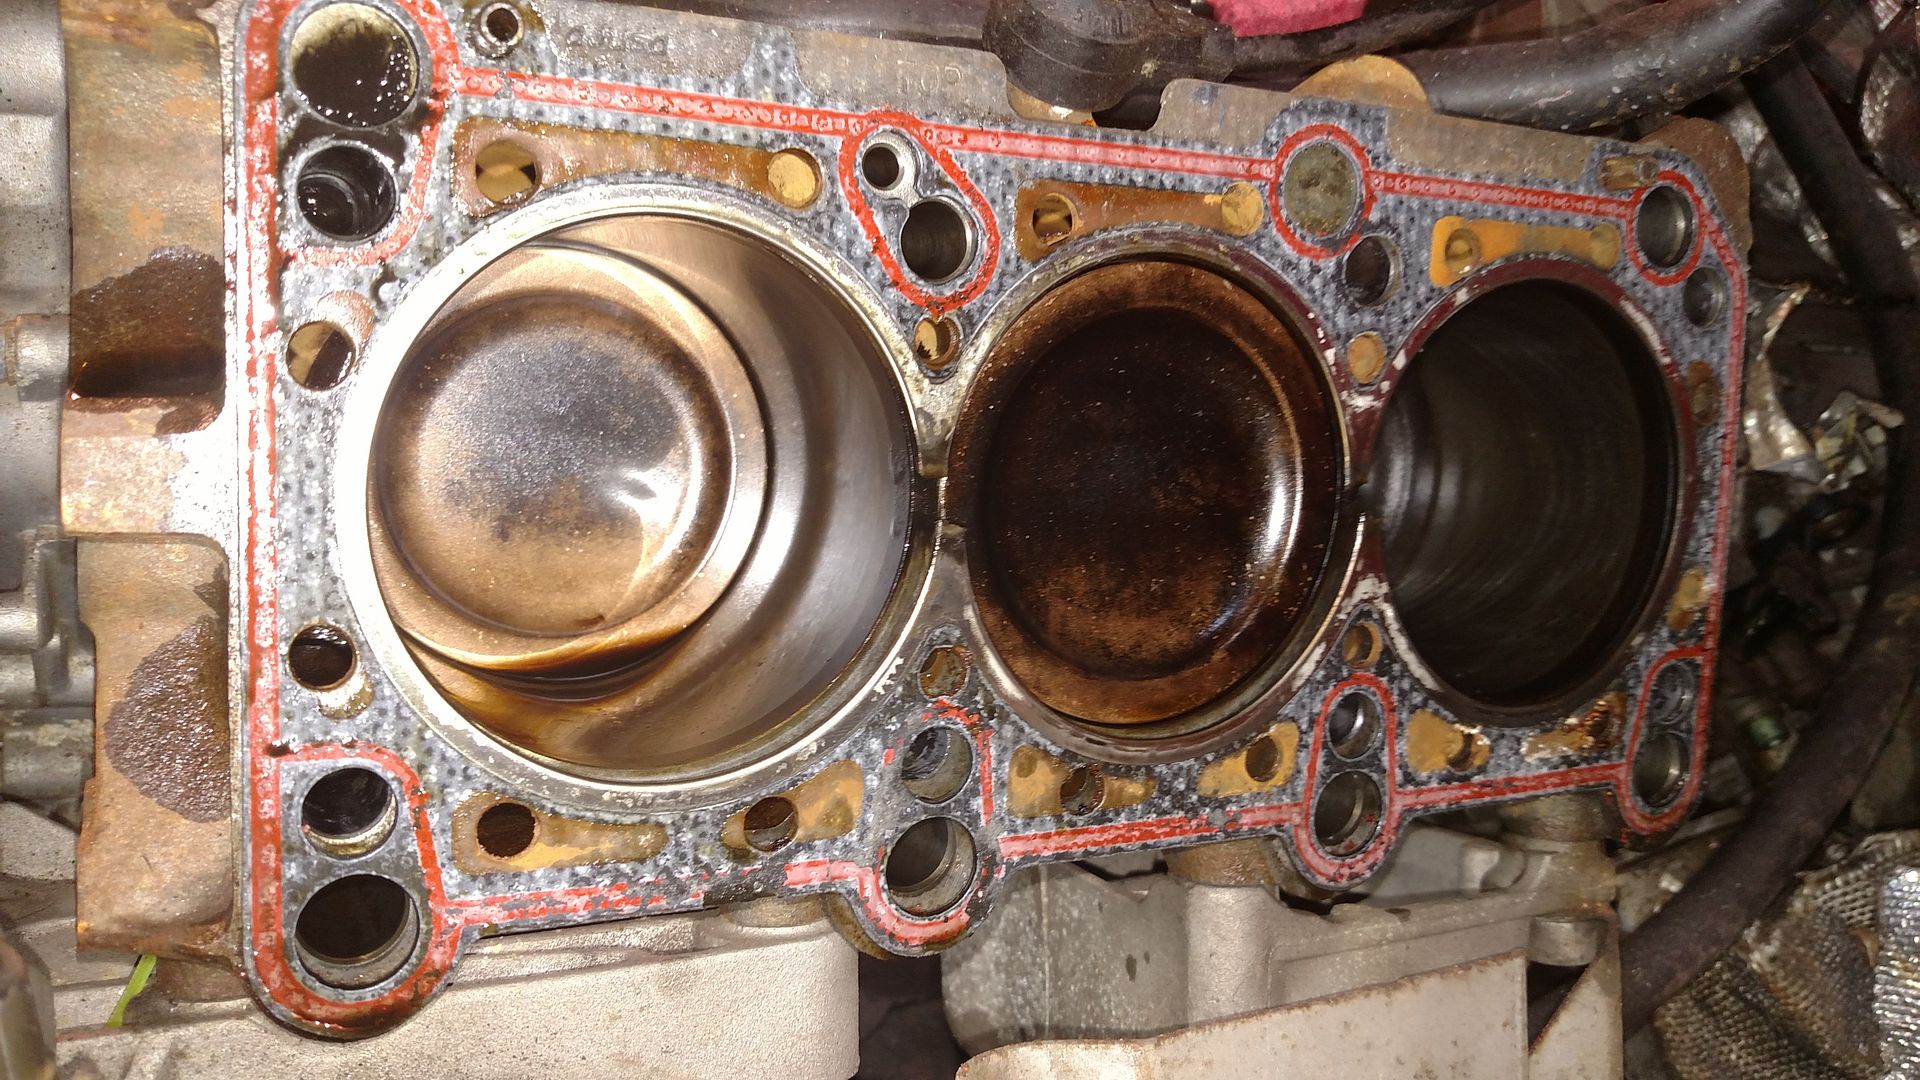
Once the motor was tired from the rear mount setup, it was time for a rebuild and redesign. The rear mount turbo worked good and eased into the boost but to really give the car the power to be competitive it needed the turbo moved up front. It started with gathering parts for the car:

3" 304 stainless mandrel bent pipes $140
3" 10' long 304 stainless straight section $100
3" 304 stainless flanges, flex pipes, v-band $100
Stainless filler wire for the MIG welder $35
Stainless filler rod for the TIG welder $30
02 weld on bung $10
Stainless turbo flanges $50
cheap Wastegate $60
Greddy profec b spec II $100
Perrin solenoid $100
HKS ssqv blow off valve $150
Bov aluminum weld on flange $ 10
Aluminum Intercooler piping 2" $80
Intercooler $100
Oil catch can/check valves $40
Header flanges: $30
Oil feed line/return line/turbo fittings $100
38# lucas racing injectors narrow 15 degree cone $200
Adjustable Fuel pressure regulator $150
260 liter per hour Bosch fuel pump $400
034 dual pump surge tank $300

Engine rebuild parts:
Full Gasket set $250
Forged 4340 rods from Integrated Engineering $850
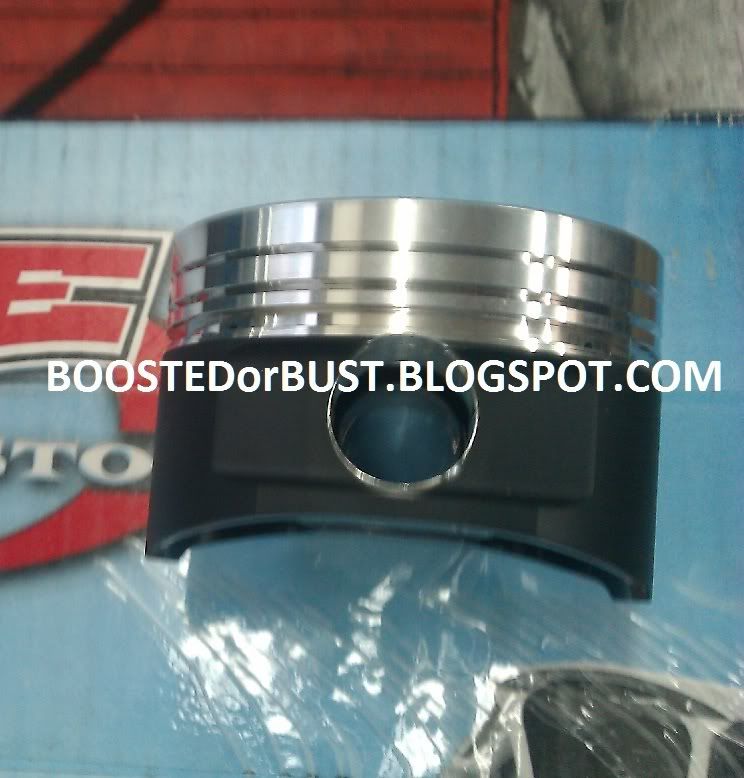
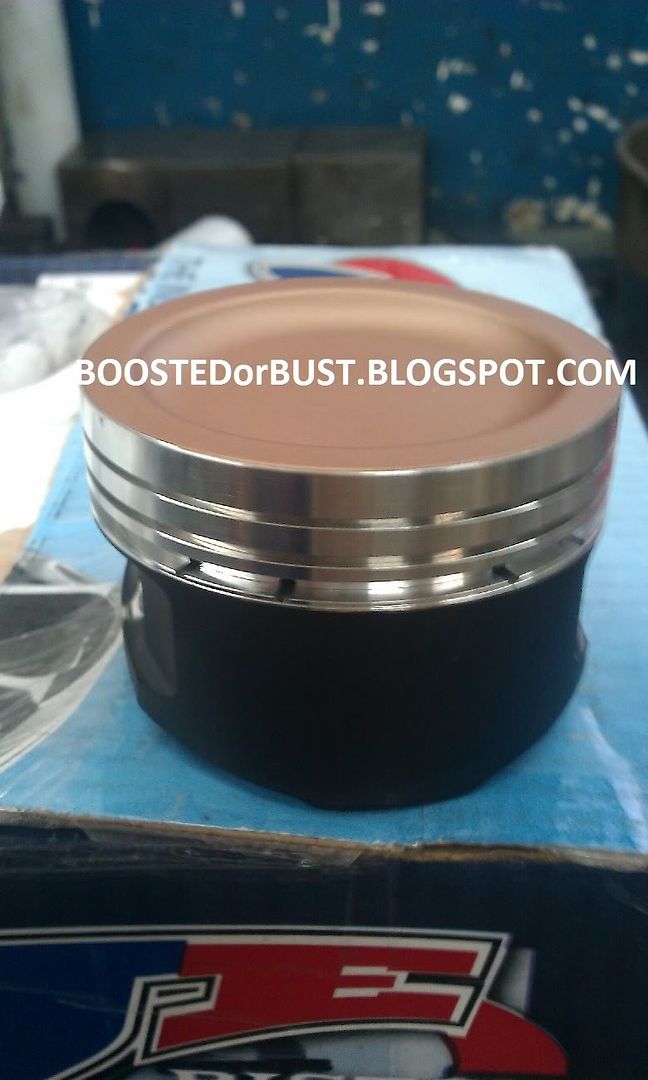
Forged Pistons w/pins, rings, & retainers from JE $1180
AAH heads used $350 (because they flow better and accept the double nested valve springs)
Inconel exhaust valves from 034 Motorsports $234
Stainless intake valves $80
New High rate valve springs from 034 Motorsports $140
OEM Engine Bearings: $100
OEM Oil pump: $200

Engine Controls:
Megasquirt II w/ ford edis 6 ignition, harness, and usb cable $650

Engine service costs:
Hot tank cleaning, Decking, & Boring 0.5mm over $300
Assembly $500

Misc Shop costs & Fabrication fees $2500

Manual 5 speed transmission (01A) w/ all running gear for swap $500 shipped
Unorthodox racing 10lb flywheel $200
Sachs 6 puck race clutch $240

B&G lowering springs $58
Braided stainless brake lines: $80
Stoptech BBK 332mm with ST40 calipers $500
Rays LM GT1 3 piece wheels w/tires $2300
Redrill wheels $300

Total: $13,797


The Engine Build:

The first step is getting the motor out. The best way if your doing the engine and transmission is to undo the subframe and lift the car off the engine, transmission, and suspension like so:


Once the assembly was pulled from the car, it was separated from the subframe, the subframe was bolted back into the car so the car could be rolled around.

The engine was put on a engine stand and disassembly started. Care was taken to take photos and label parts as they were removed. Plastic bags were used to keep bolts and things.

The electronics and harness were removed. Then the intake manifold, alternator, starter, ac compressor, power steering pump, and pulleys were removed. The heads were then removed and set aside as new heads were to be put on.

Here is a diagram that may be useful:


Keep in mind when using the megasquirt msII nearly all the engine sensors will be replaced with GM ones. General Motors parts are cheap and readily available.

For the actual build, we are going to need to find a temperature controlled environment to check all the dimensions of the pistons, block, ect prior to assembly to ensure there are no quality issues with the newly machined parts.

Piston Designs Now Available for Download in Solidworks 2010 Format

Here is a picture of the original piston duplicated in solidworks:

Note: Added ring gas port making a total of 6 rather than 4 and piston diameter is 83mm for an overbore or rebuild application where as the original piston was 82.465mm in diameter. Pistons are not round, they are slightly oval shaped to compensate for thermal expansion of material on axis of the wrist pin. This is a ROUND piston ie: no compensation of dimension along pin axis for thermal expansion!
Original Audi pistons have a pin offset of 2mm from center.  This is to reduce piston slap and noise.  All my files and the JE pistons that are being used have no pin offset.  This makes for more noise but more power and cylinder bore wear.

Click to Download: Original Piston File
Click to Download: Piston for JE Rings

Here is the final finished piston machined by JE pistons:

Photobucket
Photobucket


"Pistons that are made from 4032 wrought aluminum alloy are designed for street/strip applications utilizing compression ratios that are compatible with pump gas. These pistons also provide a quieter engine on cold start-up.

Physical Properties of 4032
Nominal Density 2.68 g/CC. 097 lb/in3

Mechanical Properties of 4032
Tensile Strength, Ultimate 380 MPa 55, 000 psi
Tensile Strength, Yield 315 MPa 46, 000 psi
Modulus of Elasticity 79 GPa 11, 400 psi
Fatigue Endurance Limit 110 MPa 16, 000 psi

2618 forged piston blank

Pistons made from 2618 wrought aluminum
Alloy are designed for higher performance
Applications such as FlyWeight or domed highcompression
Pistons. These environments necessitate
The higher tensile strength 2618 aluminum alloy.

Physical Properties of 2618
Nominal Density 2.81 g/CC. 100 lb/in3

Mechanical Properties of 2618
Tensile Strength, Ultimate 440 MPa 64, 000 psi
Tensile Strength, Yield 370 MPa 54, 000 psi
Modulus of Elasticity 74 GPa 10, 400 psi
Fatigue Endurance Limit 125 MPa 18, 000 psi

Coefficient of Thermal Expansion
2618 aluminum expands approximately 15% more than 4032 aluminum, thus the 2618's initial piston-to-wall clearance has to be 15% greater. This difference is most noticeable during a cold engine start. When cold, the 2618 piston can rock back and forth producing a slight noise (sometimes referred to as piston slap)
Until the aluminum expands. Both types of aluminum have approximately the same clearances once the pistons have expanded and the engine is running at operating temperatures. Temperature Range Average Coefficient C F μm/m K μin/in F 20 to 200 68 to 392 23.2 12.9

Coefficient of Thermal Expansion for 2618 BOLD = NEEDS EDITING
Temperature Range Average Coefficient
C F μm/m K μin/inF
20 to 200 68 to 392 20.2 11.2
EXAMPLE: When measured at room temperature, a 4 inch diameter piston made from 4032 measures 4.000". If the same piston weremeasured at 375, the piston would measure 4.0034".

Coefficient of Thermal Expansion for 4032
Temperature Range Average Coefficient
C F μm/m K μin/inF
20 to 200 68 to 392 20.2 11.2
EXAMPLE: When measured at room temperature, a 4 inch diameter piston made from 4032 measures 4.000". If the same piston were measured at 375, the piston would measure 4.0034".
"

More on the thermal expansion of pistons and cylinder walls here: Click

A whole paper on thermal expansion of pistons: Click

Head Games:

The new heads were from an AAH engine, they were ported, cleaned thoroughly, flow tested and the ports were flow balanced. The AAH heads use a hardened valve spring seat that allows for higher rate valve springs. The factory spring rates were 134lb/in. The new springs are 172lb/in. This allows for more closing force at high rpm and high boost levels to avoid valve float. Valve float occurs when the valve spring cant close the valve fast enough to follow the cam profile, allowing gases to slip by that shouldn't.


The new intake valves were stainless steel, and the exhaust valves were Inconel with a ceramic coating. The Intake valves were back-cut and blended to improve flow:


For more information about head porting and polishing, see the Wikipedia article.

The Turbo: Turbonetics 60-1 AR: .78

A Turbonetics 60-1 with an AR ratio of .78 was selected for good mid range performance. Here is a picture of the turbo:


When looking at a compressor map the x axis is in airflow in lbs/min and the y axis is pressure
The pressure ratio y axis reads in % over atmospheric pressure at sea level.
Here is its compressor map:

The Automatic Transmission 01V....aka the Devil.


This transmission is manufactured in Germany by ZF and carries the designation ZF-5HP-19. The ZF-5HP-19 Series is an electronically controlled, five speed automatic transmission with a lock-up clutch type torque converter. Two planetary gear sets, one Ravingneaux gear set and one standard planetary gear set on the output side, four rotating multiple disc clutches, three multiple disc brake clutches, and one sprag clutch (Freewheel) are used to provide the five forward speeds and reverse. The transmission found in BMW 97-Current, 3 Series E46, 5 Series E39, 7 Series E38. Audi 95-Current, A4, A8, Audi 97-Current, A6, Porsche Boxter 1996-1997 VW Passat 96-Current. Standard versions have a shift quadrant using only the left gate as shown above. The versions that are equipped with One-Touch Control, supplied as an option and model dependent, have a two section shift quadrant, also shown above. Positions P, R, N, D, 4, 3, 2, can be selected in the left-hand gate and all shifts are automatic depending on which selection was made. When the selector lever is placed in the right-hand gate, the transmission can be up-shifted manually, by tapping the lever in the direction of the “Plus” symbol, or down-shifted manually by tapping the lever in the direction of the “Minus” symbol. The separate program switch is no longer needed, as functions A and B have replaced it. If the speed of the accelerator pedal movement is greatly varied, the shift points are modified for maximum fuel economy, or a more sporting driving style accordingly. There are three shift patterns for this purpose. When a system fault is detected which could impair normal reliable operation, the ECU module interrupts the power supply to Pin 12 at the transmission case connector. The ECU module also alerts the driver of any faults by signaling the vehicles “check control” system.

In English: fancy transmission that looks great on paper but can't handle the power.

Alternatives:

In order of increasing durability:

01A 5 speed manual (delicate for lots of power)
1998-2002 Tiptronic   Level 10 transmission can modify these for more power
01E 5 or 6 speed transmissions  Information here


The 01E seems to be the best bet, the 5 speed 01E can be had cheap.  I am unsure of exact power level holding capabilities.


Suspension, Wheels, & Tires.

To keep the handling aspect of the car in balance with the added hp, modifications were made. The suspension was fairly well sorted from the factory using Bilstein struts so B&G lowering springs were added to drop the ride height 1.5" as well as stiffen the ride. Wheels were switched to Rays Engineering LMGT2 18x10" from a Nissan Skyline 400R. These wheels had a +26mm offset which will only fit with the RS4 widebody. For tires I went for the Michelin Pilot Super Sports in 265/35/R18.

Interior Re-Work.

The factory interior started off beige leather with beige carpet and headliner. The factory parts were removed and dyed or painted black. The seats were taken out and disassembled. The leather was un-stitched and traced onto new black swede. The new swede pieces were cut out and stitched together the same as the factory. The seats were re-assembled and placed back into the car.


The carpet was removed from the car and sprayed with cleaner, then pressure washed. During the wash, you could smell old pipe tobacco from the previous owner. Along with odd smells, years of dirt and grime came out of the carpet. It was dyed jet black.

Performance Myths.

Many people claim to know how to make an engine perform better claims from running motorcycle carbeurators to fuel additives to "cold air intakes".... while some of these may result in minimal gains for the most part they are a waste of time.

Engine modifications net the best results when they are designed to work together. That huge air filter and over sized cold air intake gets you nothing if your engine is still wheezing through a throttle body the size of thimble. Like wise huge exhaust and a free-flowing muffler do nothing for a car that has restrictive factory headers and exhaust valves caked in carbon buildup. Every engine is an air pump. The more air and fuel it can pass per cycle the more power it makes.